Fall-ing for Moulage!
Leaves are beginning to fall from the trees and cover the ground, the days are getting shorter and there is a definite “change” in the air. Fall is right around the corner, and with it comes the arrival of Halloween. Children and adults across the country are beginning to create elaborate scenes in their minds, setting the stage with appropriate apparel, gore, theatrical elements and changes to persona, all for the magic of creating an alter ego or “telling of the story.” Traditionally celebrated on the night of October 31, Halloween is most notably celebrated by children and young adults dressed up in carefully crafted costumes; conveying their meticulously calculated message, before perusing neighborhoods in search of candied sweets, costume parties, “haunted” houses, and other traditional autumn activities.
For most adults, this is a once a year activity, unless, of course, you are a simulation expert, to which this has now become your “typical” work day. Much in the same way the Halloween mad-hatter or Twilight star creates their persona, simulation experts weave scenarios or “short stories” that when successfully implemented will establish story-lines, settings, approximation of time and events, and an overall “sense-of- feel” that will carry the participant though pre-determined objectives and goals.
Sponsored Content:
As with all distinguished Halloween costumes, creating a realistic simulation scenario requires careful forethought to detail, theatrics, role playing and most importantly time; something most simulation experts will share with your they run short on. However Moulage, just as simulation was but a few years ago, has moved off the back burner and into the mainstream, becoming the standard in simulation scenario; and as any participant will attest to, simulations that lack these important sensory clues, fall tremendously short of telling the entire story.
It was Dr. Viktor Frankl who said it best:
“Between stimulus and response there is a space. In that space is our power to choose the appropriate response, and there, in our response, lies our growth.” – Viktor Frankl MD
Sponsored Content:
Remember, SuperMan is simply a man in blue tights without the addition of his cape and striking red “S” on his chest.
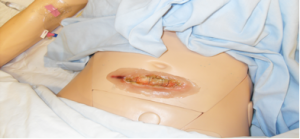
Wound Dehiscence with Odorous Drainage
All Right Reserved
Moulage Shopping Cart?
Ghosts, Goblins, and smart Simulation Coordinators and Specialists will begin perusing the streets in search of their local Halloween shops and supply yards; stocking up on all things simulation:
What sort of exciting things will you find in our shopping cart?
White face make-up
Simulated body piercings
Wigs
Severed limbs
Scars
Tattoo sleeves
Intestines
Black tooth wax
Modeling wax
Fake blood
Blood powder
Fake wounds
Bumps and blisters
Odorous sprays
Broken glasses/frames
Barrier spray
Flesh/fake skin
Plastic feces
Plastic vomit (shown below)

and now moving on to the Moulage….
Bruises/Contusions
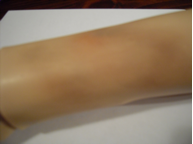
Bruises change in appearance over time, and it is possible to create a timetable of events by looking at a bruise and noting changes in color and progression While bruises are not difficult to create, bruising characteristics such as size, cause, and stage of color progression should be considered prior to beginning Moulage application. When it first appears, a bruise will be reddish looking, reflecting the color of the blood in the skin. Within a day or two, the reddish iron from the blood undergoes a change and the bruise will begin to appear a darker red-blue. Bruising will then begin to progress in color becoming dark blue, shades of purple, reddish to bluish as the background turns green, purple on green, purple on yellow-green, yellow green, yellow-brown, and finally, a return to normal skin color. For healthy individuals, most bruises disappear within seven days, while larger ones generally go away within two weeks. However, bruises may last longer in elderly adults and are often more severe in the color stages.
Ingredients:
Red Blush (powder make-up)
Pink Blush (powder make-up)
Purple eye shadow (powder make-up)
Dark Burgundy eye shadow (powder make-up)
Violet eye shadow (powder make-up)
Gray Purple eye shadow (powder make-up)
Dark blue eye shadow (powder make-up)
Green eye shadow (powder make-up)
Purple eye shadow(powder make-up)
Brown eye shadow (powder make-up)
Yellow cake make-up (powder make-up)
Make-up sponge
Blush brush applicator
Eye shadow applicator
Bruise (Fresh)
Using your fingers or a make-up applicator, liberally apply dark red blush make-up in an abstract pattern (not necessarily circular) to skin of simulator. Using the sponge tip or your fingers, apply color creating a blotchy pattern on the skin; varying the intensity and depth of color as you fade out and away from the center (point of contact) of the bruise and blend into the surrounding skin.
“Feather” bruising colors toward the center (leave the center red) and eventually fading color out on the skin around the outer bruising edges. Keep in mind, color should be blotchy and uneven. If you apply too much color, dab or “lift off” with a 4×4 or make-up sponge. Start with blush (red/pink) powder make-up to create your bruise shape. Very lightly “feather” blue unevenly around the edges.
Bruise (1-48 hours)
 Using your fingers or make-up sponge, apply red color in an uneven pattern (not circular,) with uneven intensity and consistency; blotchy.
“Feather” bruising colors toward the center (leave the center red) and eventually fading color out on the skin around the outer bruising edges. Keep in mind, color should be blotchy and uneven. If you apply to much color, dab or “lift off” with a 4×4 or make-up sponge. .
Follow steps for fresh bruise, lightly, unevenly, and randomly apply one or more of the following colors, dark burgundy, violet, grey or purple.
Bruise (3-4 days)
 Follow steps for fresh bruise and older (1-48 hours) bruise. Apply green in same pattern, fading the color at the outer edges. Apply blotches of grey and purple to the center, blend. Using a stipple sponge apply more purple over red center, blot with tissue or 4×4 to remove excess and mute color. This will really help to spread out that color.
Bruise (5-10 days)
 Follow steps for bruising (3-4 days). Apply light blotches of yellow over green and blend slightly using your fingers or make-up sponge. “Feather” bruising colors toward the center and eventually fading color out on the skin around the outer bruising edges. Keep in mind; you will have more green, grey and purple at the five day mark, where the color of the bruise has mostly faded out to the yellow, yellow-brown stage by the tenth day.
Environmental Settings:
Public Health case: To Simulator add: Gray hair wig and reading glasses. Using a small paint brush, apply yellow and brown eye shadow to front and sides of teeth to create a slightly “decayed” appearance. Create bruises in varying sizes and progression on upper arms, chest and legs of simulator. Add one set of bruises (1-48 hours) in the shape of “finger print” marks on simulators wrist. (To create proper spacing, apply bruising colors to your fingers, and then grasp simulators arm. Continue with color progression on simulator.) If available add “home” furnishings: Table, chairs, sofa, etc. Create extra clutter to simulators bedside table, (waded up tissues, dishes.) Care provider is patients stressed adult child who has moved back home with her teenage children to care for patient. Participants to arrive at door to follow up on a referral; care provider is resistant to letting them in.
Clean up:
Remove bruises with a soft cloth that has been dipped in GooGone. Remove teeth from simulator. Using a soft toothbrush and GooGone, gently brush away make-up from teeth and rinse under warm water, pat dry with soft cloth and return to simulator.
Time saving hint:
Place old, used, eye shadows together in a sealable plastic bag according to bruising stages. Using a rolling pin, carefully roll pin over bag to crumble colors into a fine powder. Apply make-up using a blush brush, eye shadow applicator or your finger.
I hope this helps you with your Healthcare Simulation moulage! Please stop by and say hello at www.moulageconcepts.com, where you can learn more moulage secrets!
Wishing you great success in your Moulage endeavors.
Moulage Concepts
Bobbie Merica
Author/Business Owner
Simulation Coordinator/Consultant
This article is referenced from Moulage-Bridging the Gap in Simulation TM, book on CD and is, unless otherwise stated, the property of Moulage Concepts. Copyright and other intellectual property laws protect these materials. Reproduction or retransmission of the materials, in whole or in part, in any manner, without the prior written consent of the copyright holder, is a violation of copyright law.
Lance Baily, BA, EMT-B, is the Founder & CEO of HealthySimulation.com, which he started while serving as the Director of the Nevada System of Higher Education’s Clinical Simulation Center of Las Vegas back in 2010. Lance is also the Founder and acting Advisor to the Board of SimGHOSTS.org, the world’s only non-profit organization dedicated to supporting professionals operating healthcare simulation technologies. His co-edited Book: “Comprehensive Healthcare Simulation: Operations, Technology, and Innovative Practice” is cited as a key source for professional certification in the industry. Lance’s background also includes serving as a Simulation Technology Specialist for the LA Community College District, EMS fire fighting, Hollywood movie production, rescue diving, and global travel. He and his wife Abigail Baily, PhD live in Las Vegas, Nevada with their two amazing daughters.
Sponsored Content:


